This is a simple and flexible implementation of a randomized decision forest that enables object recognition and classification in images. Training and classification data is provided
as simple 2D images with support for up to 256 classification labels.
I became interested in this technique while working on Kinect for Xbox 360. Kinect leverages randomized decision
forests as a key component of its skeletal tracking pipeline. This algorithm is highly parallelizable and capable of
solving many different kinds of pattern recognition and data segmentation problems.
Configuration: control tree count, maximum tree depth, node trial count, training sample percentage, node pruning policies, and kernel radius to balance the complexity vs. accuracy of your forests.
Performance: multi-threading using C++11 threads to significantly speed up training.
Multi-purpose: identify the dominant object in a sample set, or segment multiple objects in parallel.
Flexibility: simple 8-bit data format with support for up to 256 individual object classes.
Serialization: save and load forests for quick reuse.
Randomized Forest Demo for Windows (33 KB)
MNIST Training and Test Samples (10.5 MB)
18-tree Demo Forest (92.85% accuracy) (22.7 MB)
Randomized Decision Forest Source Code (C++)
If you'd like to test out the pre-built app, or use the source as-is, then you'll need to download the MNIST training and test data and unzip
it into the same folder as the demo program. Next, you could train your own forest, but I'd recommend that you save yourself some time and use my existing 18-tree forest by
unzipping it to the same folder as the program.
Running the program (on Windows) without any parameters will display the following:
Usage: simple-rdf-x64.exe [options]
  --train  [output forest filename]                     Generates a forest based on the MNIST dataset.
  --classify [forest filename] [image filename]         Classifies a bitmap image and reports the type.
  --verify [input forest filename]                      Tests the accuracy of a forest against the MNIST test set.
Training the decision forest is straightforward — you simply provide training data to the interface and wait (a potentially long time) for training to complete. Once your tree is built, it's a good idea to save it out to disk so you can quickly use it again in the future.
DecisionForest forest;
// Our forest will contain 18 trees, each trained on 80% of the available data.
DecisionForestParams forest_params = {18, 80};
// Each tree will have a maximum depth of 20, and run up to 1,200 trials per node.
// Our example uses 11 unique labels to identify objects, a maximum kernel radius
// of 20 pixels when classifying a pixel, and a minimum node sample size of 2.
DecisionTreeParams tree_params = {20, 1200, 11, 20, 2};

// Train our forest using our params and prepared training data.
if (!forest.Train(forest_params, tree_params, &training_data, &error)) {
  cout << "Error detected during training: " << error << endl;
  return;
}

// Save our forest to disk for easy future access.
if (!SaveDecisionForest("output.forest", &forest, &error)) {
  cout << "Error detected while saving forest to disk: " << error << endl;
  return;
}
Classifying with the decision forest is also straightforward, but you have a couple of options:
Image-level classification: you provide an image, you get back the dominant classification that it contains. Useful if you simply want to know the object that's most represented in the image.
Pixel-level classification: you provide an image, you get back an image that identifies the dominant class at each pixel. Useful if your image contains multiple objects and you want to segment them.
// Load a forest from disk. This is much faster than training a new one!
if (!LoadDecisionForest("input.forest", &forest, &error)) {
  cout << "Error detected while loading forest from disk: " << error << endl;
  return;
}

// Classify an image to identify the dominant object that it contains.
uint8 classification = forest.Classify(&image, &error);

// Alternatively, we can request a classification map, to view the per-pixel
// classification written to our output_image.
forest.ClassifyImage(&image, &output_image, &error);
For a more comprehensive example, check out main.cpp from the source release, which fully demonstrates the loading of training data from the MNIST data set, training a forest, saving the forest to disk, loading a forest, and classifying test data.
A standard benchmark for machine learning algorithms is their performance against the MNIST handwriting dataset. By default, this project trains and classifies using the full MNIST set consisting of 60,000
training samples, and 10,000 separate test samples.
This project achieved a maximum accuracy rating of 96.5% in my own tests, using 30 trees, 2,000 node trials, and a maximum tree depth of 20. This is right in line with expected results, as
this approach generally peaks at around 97% in broader field trials.
The following chart relates the tree count within the forest to the observed accuracy of the forest:
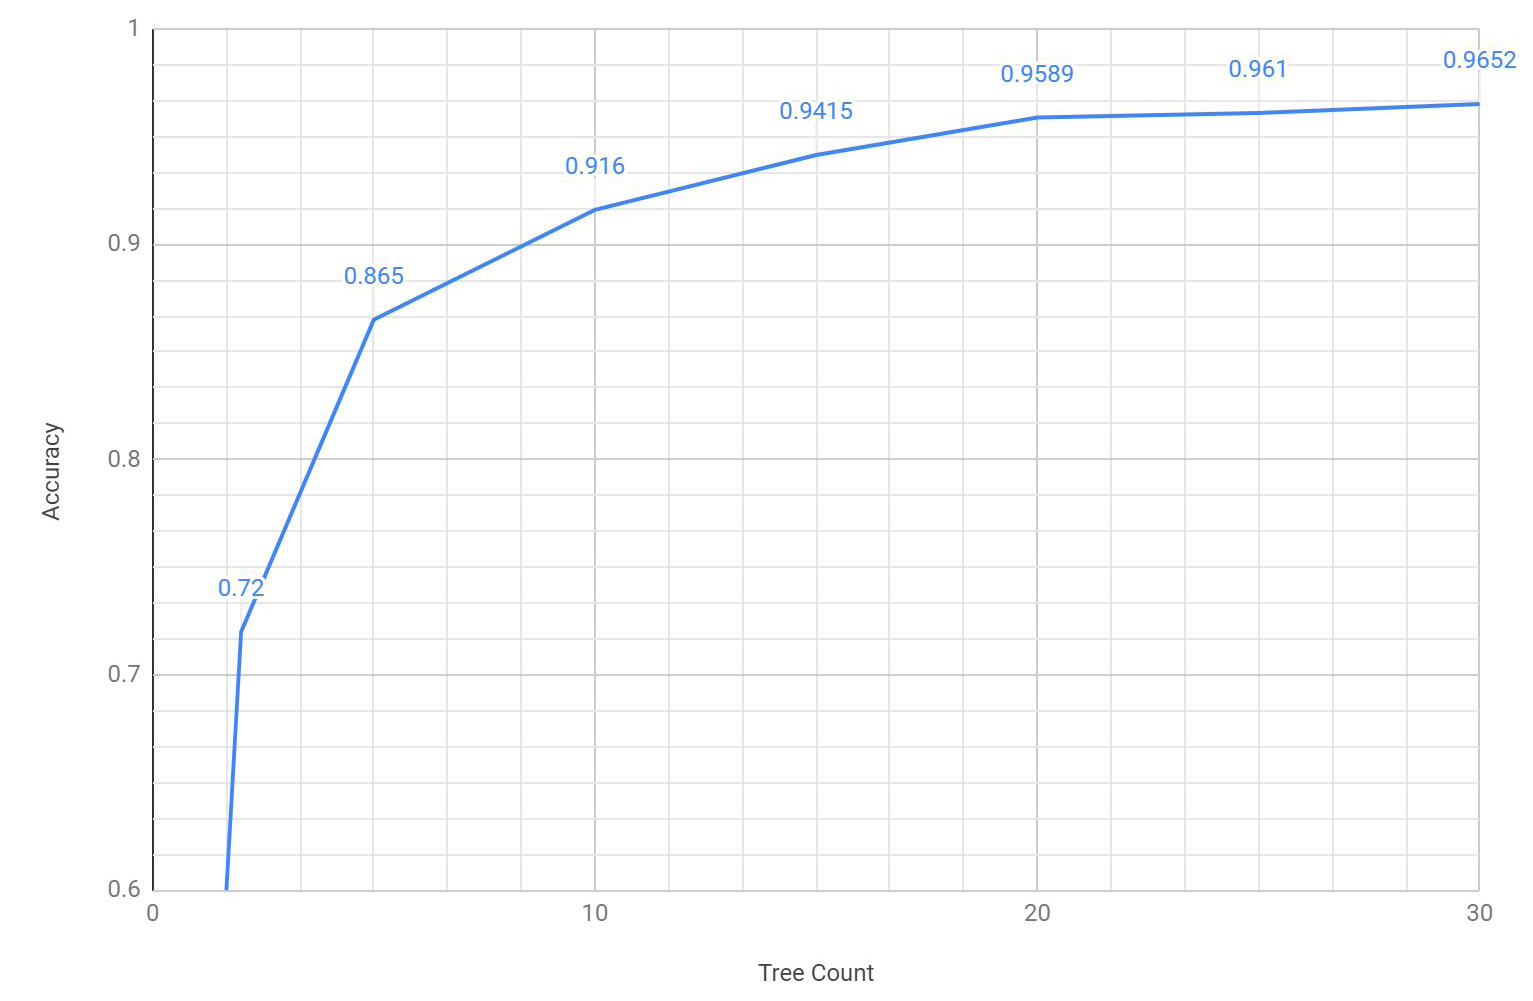
While it's theoretically possible to achieve even better results through further tuning of parameters (e.g. increase the node trial count), the logarithmic relationship predicts diminishing returns as training costs continue to increase linearly. For reference, training a forest with 30 trees and 2,000 node trials required over 24 hours on average 2019 hardware.
For more information check out this blog post, which covers the basics of random forests.
